


There are 15 campsites for tents and 6 campsites for caravans/motorhomes run by the Island Council for overnight stays in the protected natural areas of Tenerife.
These are signposted outdoor camping areas where you can stay for a maximum of 7 days in a row, either with a tent or, in some cases, with caravans, motorhomes and adapted vehicles.
To use this network of campsites free of charge, you must make a prior request a maximum of 21 days in advance through the page of each campsite:
- Las Calderetas Campsite for tents
- El Contador Campsite for tents
- Chío Campsite for tents
- Fuente del Llano Campsite for tents
- Las Hayas Campsite for tents
- La Tahona Campsite for tents
- Ramón Caminero Campsite for tents
- Las Raíces Campsite for tents
- El Lagar Campsite for tents
- Arenas Negras Campsite for tents
- Barranco Fuente Pedro Campsite for tents
- San José de Los Llanos Campsite for tents
- Los Pedregales Campsite for tents
- Las Lajas Campsite for tents
- La Caldera Campsite for tents
- Arenas Negras Campsite for motorhomes
- Chío Campsite for motorhomes
- El Lagar Campsite for motorhomes
- Las Lajas Campsite for motorhomes
- Las Raíces Campsite for motorhomes
You can also locate your nearest campsite on the interactive map.
What services are available at the campsites
Although the campsites do not have their own facilities, many are located next to recreational areas that have services such as:
- Toilets: available depending on opening hours and the presence of campsite staff.
- Cookers and water: may be used subject to the rules applicable to the recreational area.
Important: check the specific services and opening hours for each campsite, as they vary depending on the location.
How to make a reservation with Tenerife ON
- Access:
Visit the Tenerife ON website or app. - Registration and validation:
Log in with your username and password. - Location of the campsite:
Search for the campsite in the Facilities section, through the search tool or by following the links provided at the top of this page. - Information:
Enter the number of people and click on “Check availability". - Booking:
Select the dates of arrival and departure and fill in the online form with your personal details. If you are only booking for one night, you still need to indicate your date of arrival and departure on the following day. Otherwise, the booking will not be registered. - Confirmation:
Save or print the permit after confirming the booking.
Booking conditions and additional information
- Maximum advance notice:
Bookings can be made up to 21 days in advance. - Weekly availability:
Every Monday at 07:00 am (Canary Islands time) the available pitches for the campsites for the following two weeks are made available. - Check beforehand:
Always check the information page of the chosen campsite on the Tenerife ON website to verify availability and specific conditions. - Services and regulations:
Visit the Tenerife ON website to find out more about the associated recreational areas and applicable regulations. - Contact:
If you need more information, you can call the Citizen Services Centre of the Tenerife Island Council: 901 501 901
Remember to enjoy your camping experience in Tenerife safely and always respect the natural environment.
What permits do I need to visit Teide
Visitors to Teide National Park are required to apply for two different types of permits, depending on the trail:
PNT 10 (Telesforo Bravo):
This trail connects the upper cable car station with the Teide crater. To access it, you must book your place through the trail page:
PNT 07, PNT 09, PNT 23 and PNT 28:
You can access any of these four trails by requesting permission through the Tenerife ON platform on the information pages for each itinerary:
- Book permit for PNT 07 Montaña Blanca - La Rambleta
- Book permit for PNT 09 Teide – Pico Viejo – Mirador de las Narices del Teide
- Book permit for PNT 23 Los Regatones Negros
- Book permit for PNT 28 Chafarí
Important: Bookings for these trails open every Monday at 07:00 am (Canary Islands time) for the following 21 days.
How to make a reservation with Tenerife ON
- Access:
Visit the Tenerife ON website or app. - Registration and validation:
Log in with your username and password. - Location of the trail:
Find the trail's information page for which you want to request a permit in the Routes section, using the search tool or by following the links provided at the beginning of this FAQ. - Information:
Enter the number of people. Click on “Check availability”. - Booking:
Select the available date and complete the online form with your personal details. - Confirmation:
Save or print the permit after confirming the booking.
Essential information on permits issued by Tenerife ON
- Number of bookings:
You can book individually or for up to 15 people. - Availability:
Booking is available up to 21 days in advance. Beyond this period, days shaded in grey are not yet open for bookings. - Authorisation required:
You must bring a physical or digital copy of the permit along with your ID or passport on the day of the visit. - Cancellations:
If you are unable to use your reservation, please cancel to avoid penalties. Failure to comply will lead to a three-month suspension from applying for new permits
Conditions of use of the trails
- The permit is valid only for the date and time indicated.
- Suitable mountain equipment (shoes, warm clothing, water and a torch) is mandatory. You can check the mandatory equipment in the booking conditions on the PNT 07 trail information page.
- Do not leave the marked trails; littering is forbidden.
- It is forbidden to use devices that amplify sound or damage the flora and fauna of the park.
- Group guides must be officially accredited by Teide National Park.
Tenerife ON booking conditions and additional information
- Maximum advance notice:
Bookings can be made up to 21 days in advance.
Dates outside this period will be shaded in the calendar. - Weekly update:
Every Monday at 07:00 am (Canary Islands time) the slots for the following two weeks are made available. - Check before you go:
Before your visit, check weather conditions, alerts and incidents on the Tenerife ON website or app. - Contact:
For further queries, call the Citizen Services Centre of the Tenerife Island Council: 901 501 901
Precautions and related risks
The natural environment of Teide National Park involves risks, such as:
- Rockfalls and rockslides.
- Slippery terrain.
- Sudden temperature changes.
We recommend you take all precautions to enjoy your visit safely and respectfully.
The trails that require authorisation in Anaga Rural Park are:
- La Ensillada – Cabezo de Tejo – La Ensillada (El Pijaral Strict Nature Reserve)
- La Asomada – Cruz de Afur (Monte de Aguirre Exclusion Zone)
Who can apply for a permit
Booking is compulsory for all natural persons and can be done through the “Availability and permits” section on the trail information page:
- Request a permit for La Ensillada – Cabezo de Tejo – La Ensillada trail
- Request a permit for La Asomada – Cruz de Afur trail
Legal entities or tourist companies are not permitted to make bookings or organise trips.
How to make a reservation with Tenerife ON
-
- Access:
Visit the Tenerife ON website or app. - Registration and validation:
Log in with your username and password. - Location of the trail:
Search for the trail in the Routes section, through the search tool or by following the links provided at the top of this page. - Information:
Enter the number of people and choose the time slot if available for that trail. Click on "Check availability". - Booking:
Select the available date and complete the online form with your personal details. - Confirmation:
- Access:
Essential information on permits
- Number of bookings:
You can book individually or for up to 5 people. - Availability:
Booking is available up to 14 days in advance. Beyond this period, days shaded in grey are not yet open for bookings. - Authorisation required:
You must bring a physical or digital copy of the permit along with your ID or passport on the day of the visit. - Cancellations:
If you are unable to use your reservation, please cancel to avoid penalties. Failure to comply will lead to a three-month suspension from applying for new permits.
Conditions of use of the trails
- The permit is valid only for the date and time indicated.
- Do not leave the marked trails; littering is forbidden.
- It is forbidden to use devices that amplify sound or damage the flora and fauna of the park.
Booking conditions and additional information
- Maximum advance notice:
Bookings can be made up to 14 days in advance.
Dates outside this period will be shaded in the calendar. - Weekly update:
Every Monday at 07:00 am (Canary Islands time) the available slots for the following week are opened. - Check before you go:
Before your visit, check weather conditions, alerts and incidents on the Tenerife ON website or app. - Contact:
For further queries, call the Citizen Services Centre of the Tenerife Island Council: 901 501 901.
Precautions and related risks
The natural environment of Anaga Rural Park involves risks, such as:
- Rockfalls and rockslides.
- Slippery terrain.
- Sudden temperature changes.
We recommend you take all precautions to enjoy your visit safely and respectfully.
No, you can only climb to the summit (“Pico del Teide”) with a permit, since there is a limit on the number of people allowed to enter per day.
The entire route from La Rambleta to the Peak is a highly vulnerable area and is very sensitive to human activity. It is therefore necessary to control access and activities in the area to protect it.
The activity tracker is designed to help you enjoy outdoor leisure activities in Tenerife even more.
By being able to save the details of your trips, you can remember what you have done and when, you can try to beat your own times or even share them with your circle of friends and family.
So, the more activities you record, the more information you will have stored about your achievements and adventures.
At Tenerife On we do our best to keep the information on each facility always up to date.
So if for any reason there are changes in the restrictions of use, these will be reflected both in the information file and in the general list of alerts and warnings.
Therefore, we recommend that you consult the information on the facility before you visit or carry out an activity.
Have you already downloaded the Tenerife ON app on your mobile phone?
Then you can keep a record of your routes and show them off to your family and friends. Or better still, share the experience!
It’s as easy as that:
Steps to record your activities with the Tenerife ON app.
1. Select the route
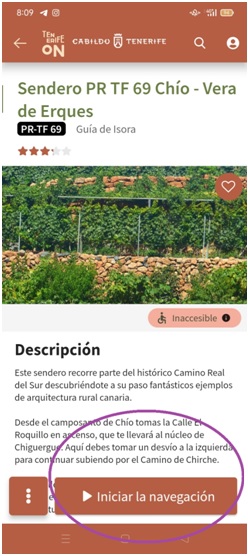
Make sure you are logged in to the mobile app and open your chosen trail.
2. Start navigation
Once you are on the information page of the trail, tap the “Start Navigation” button at the bottom of the screen.
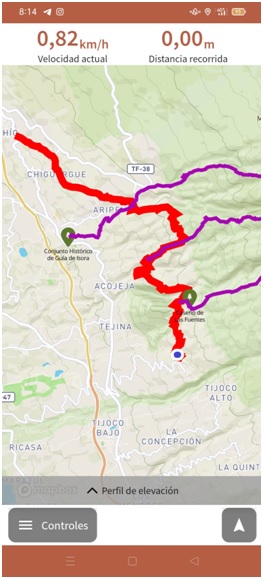
If you have given the app permission to detect your location, you will be directed to a screen where you will see your trail marked in red and your location represented by a blue dot.
3. Start your route
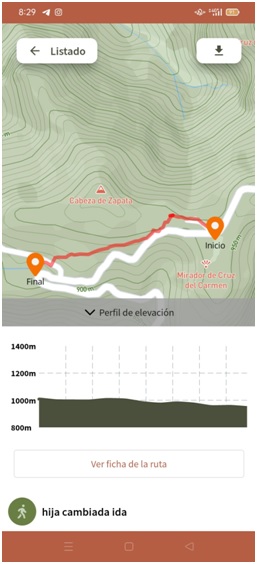
From this point on, your activity will be recorded, and the corresponding data will be saved on your device:
- Route profile.
- The stops you make.
- The time you spend on the route.
- Elevation profile.
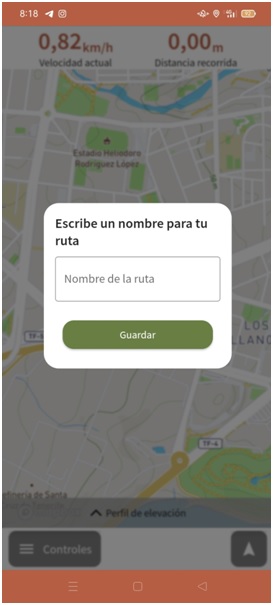
4. Pause or end navigation
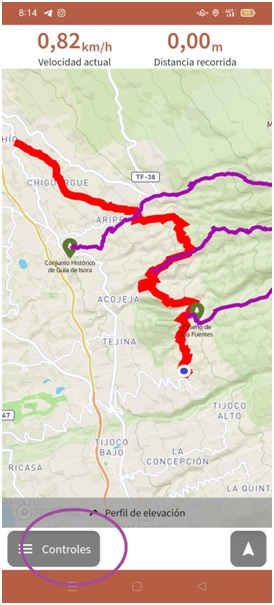
Whenever you want, you can pause to rest or you can end navigation and save your route. To do this, simply tap the “Controls” button in the bottom left corner of the screen.
Choose between “Pause navigation”, “Return to navigation” or “End navigation” to save your route.
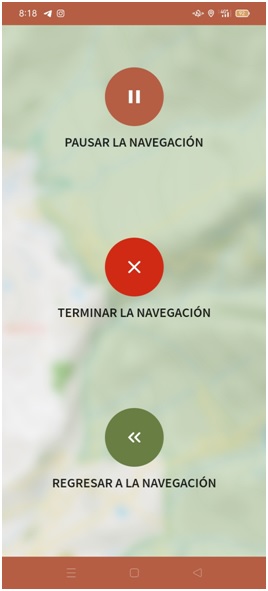
If you decide to end navigation, you can give your route a name of your choosing so that it is always available on Tenerife ON and can be consulted, shared or revisited whenever you wish.
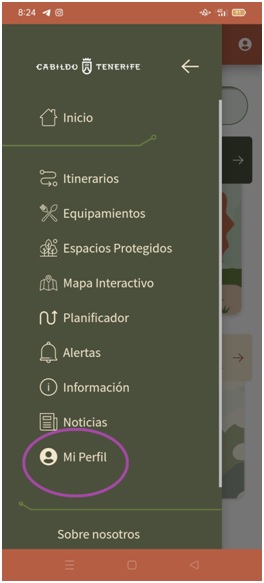
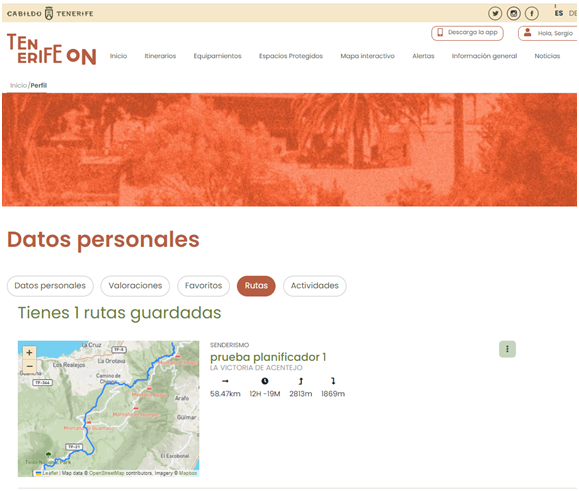
5. Consult your activities
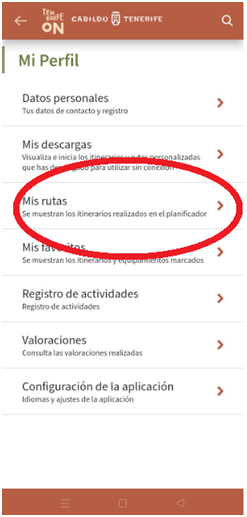
To access your records, go to “My Profile” from the main menu or from the icon in the top right-hand corner of the screen.
Once you are in your profile, you can go to “Activities Register” and consult the list of routes that you have saved.
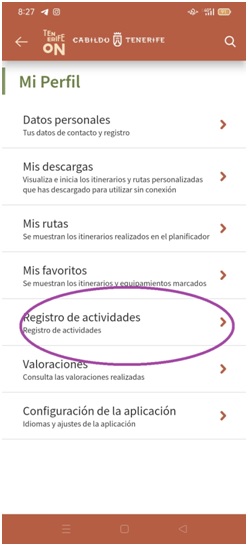
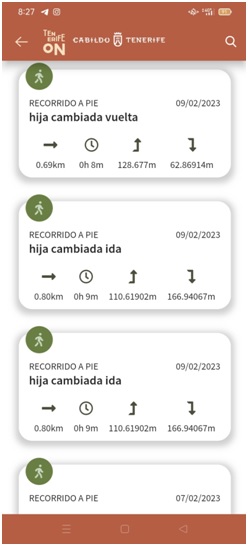
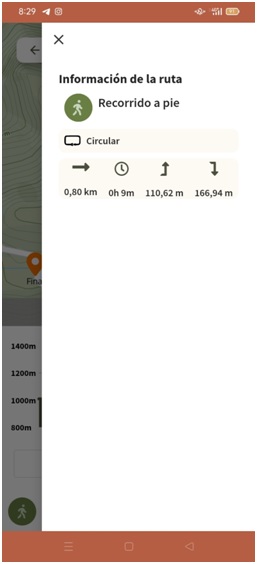
Each activity saved in your profile has a small file with all the information you recorded at the time (route files, time, total ascent, elevation profile...).
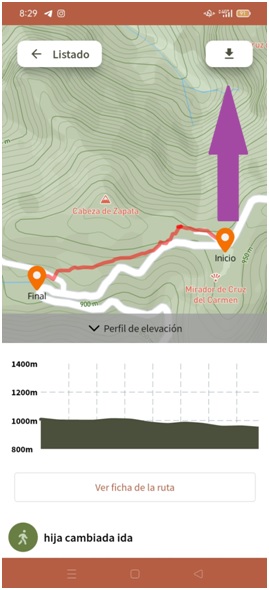
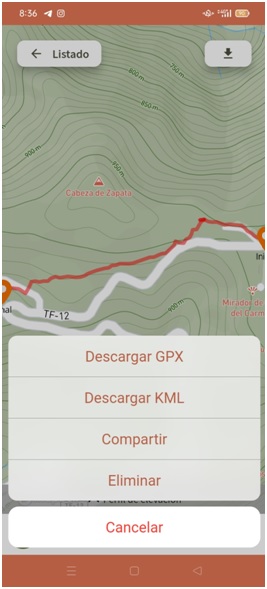
6. Download or share your activity
To download the route files for your saved activities or share them, select the activity you wish to view and use the download button in the top right-hand corner.
Now that you know how to get the most out of the app, why not take a walk on the wild side and start logging all your activities with Tenerife ON.
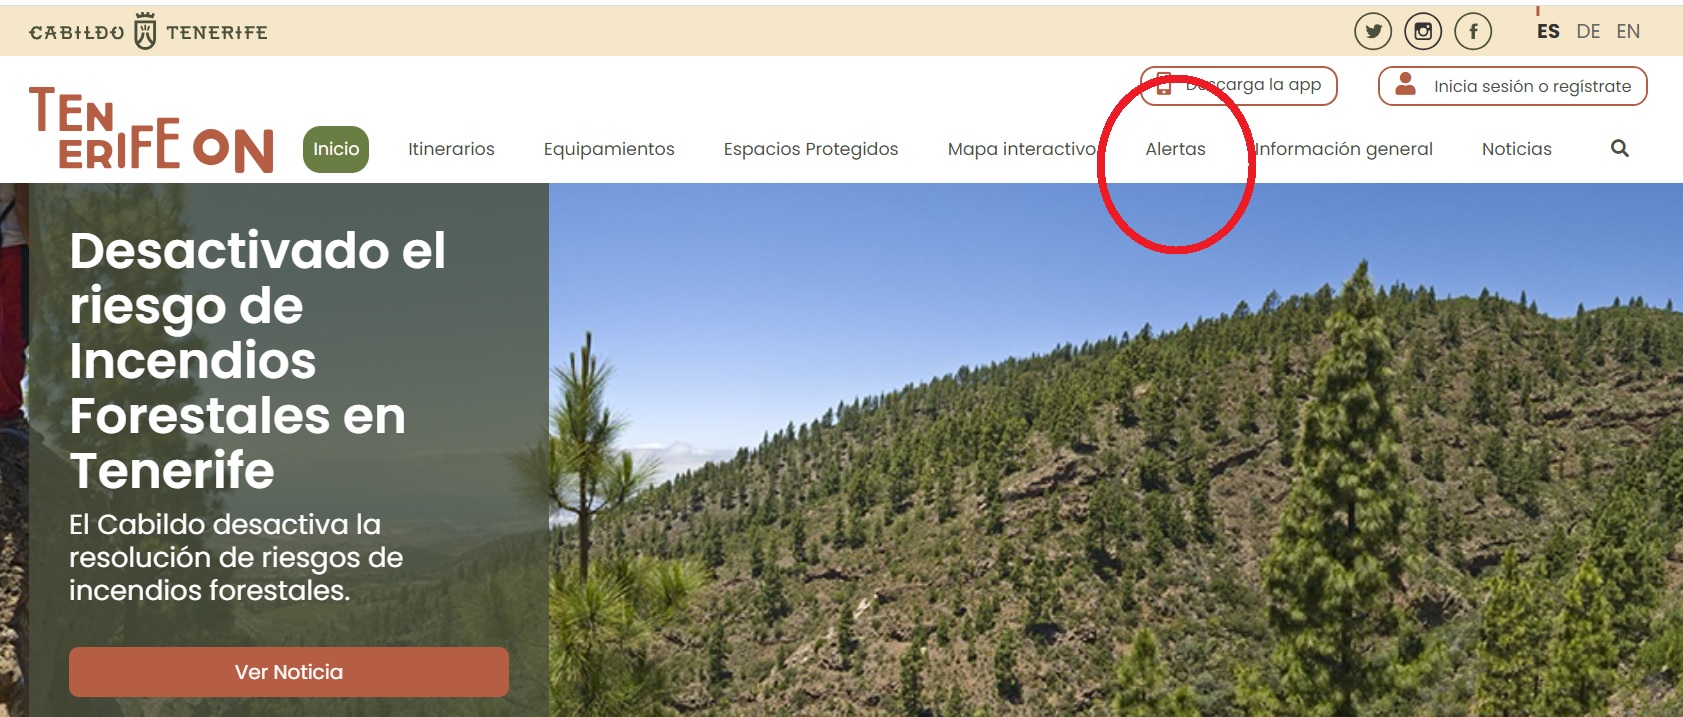
At Tenerife ON we want you to enjoy your trips on the island safely, which is why we keep our Alerts and Incidents section always up to date.
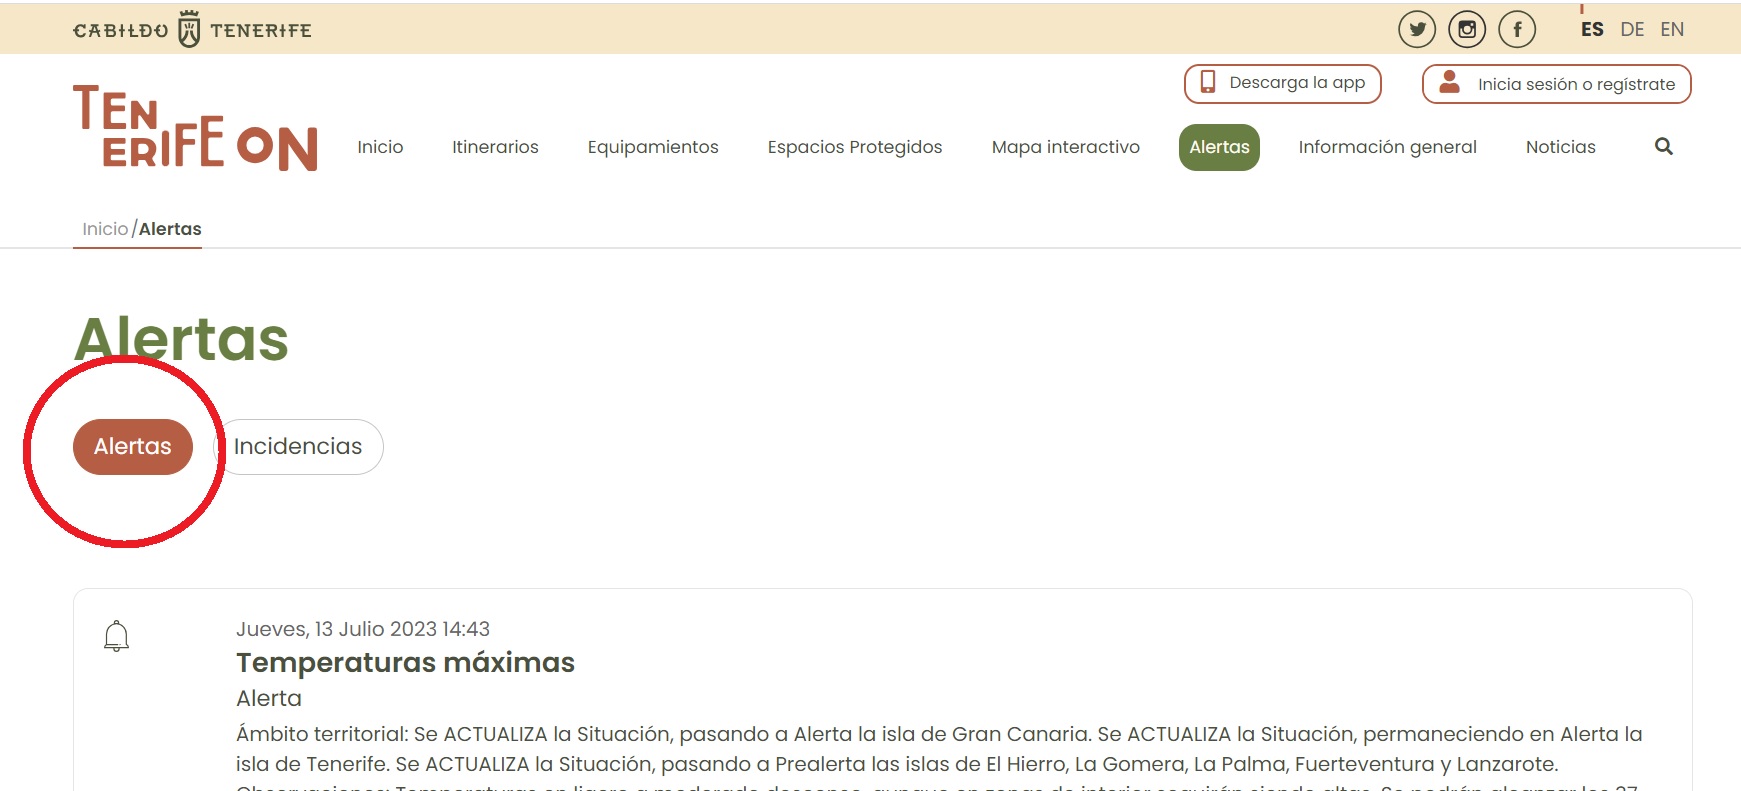
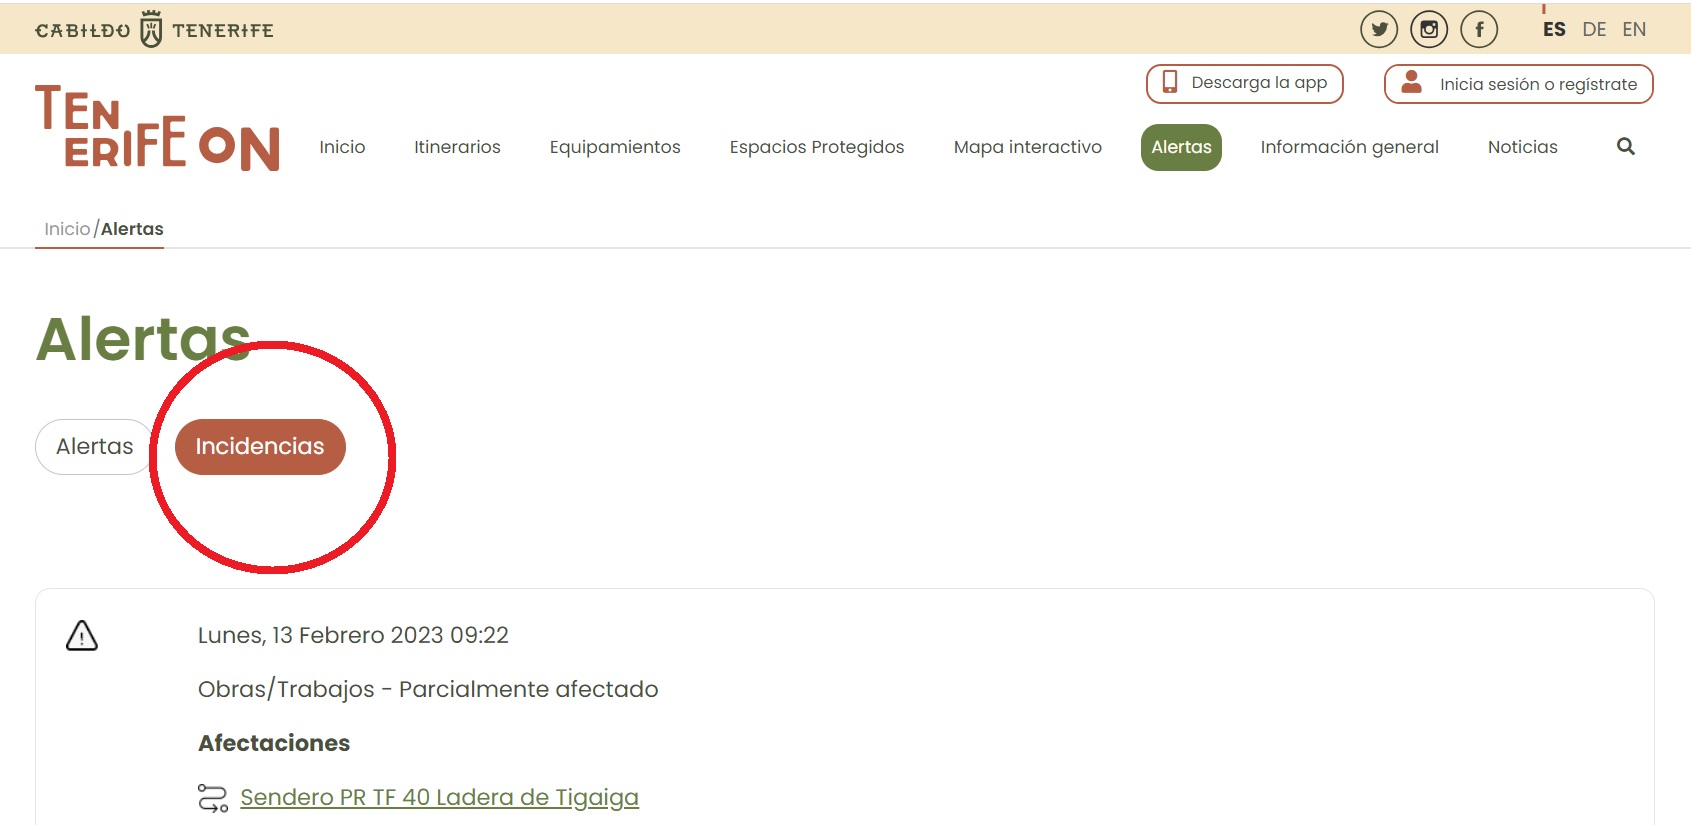
In this section you will find 2 types of announcements:
Alerts
Issued by the Government of the Canary Islands or by Resolutions of the Tenerife Island Council, related to weather conditions, health risks, etc. These alerts contain recommendations and/or prohibitions that you should take into account when planning your outdoor leisure activities.
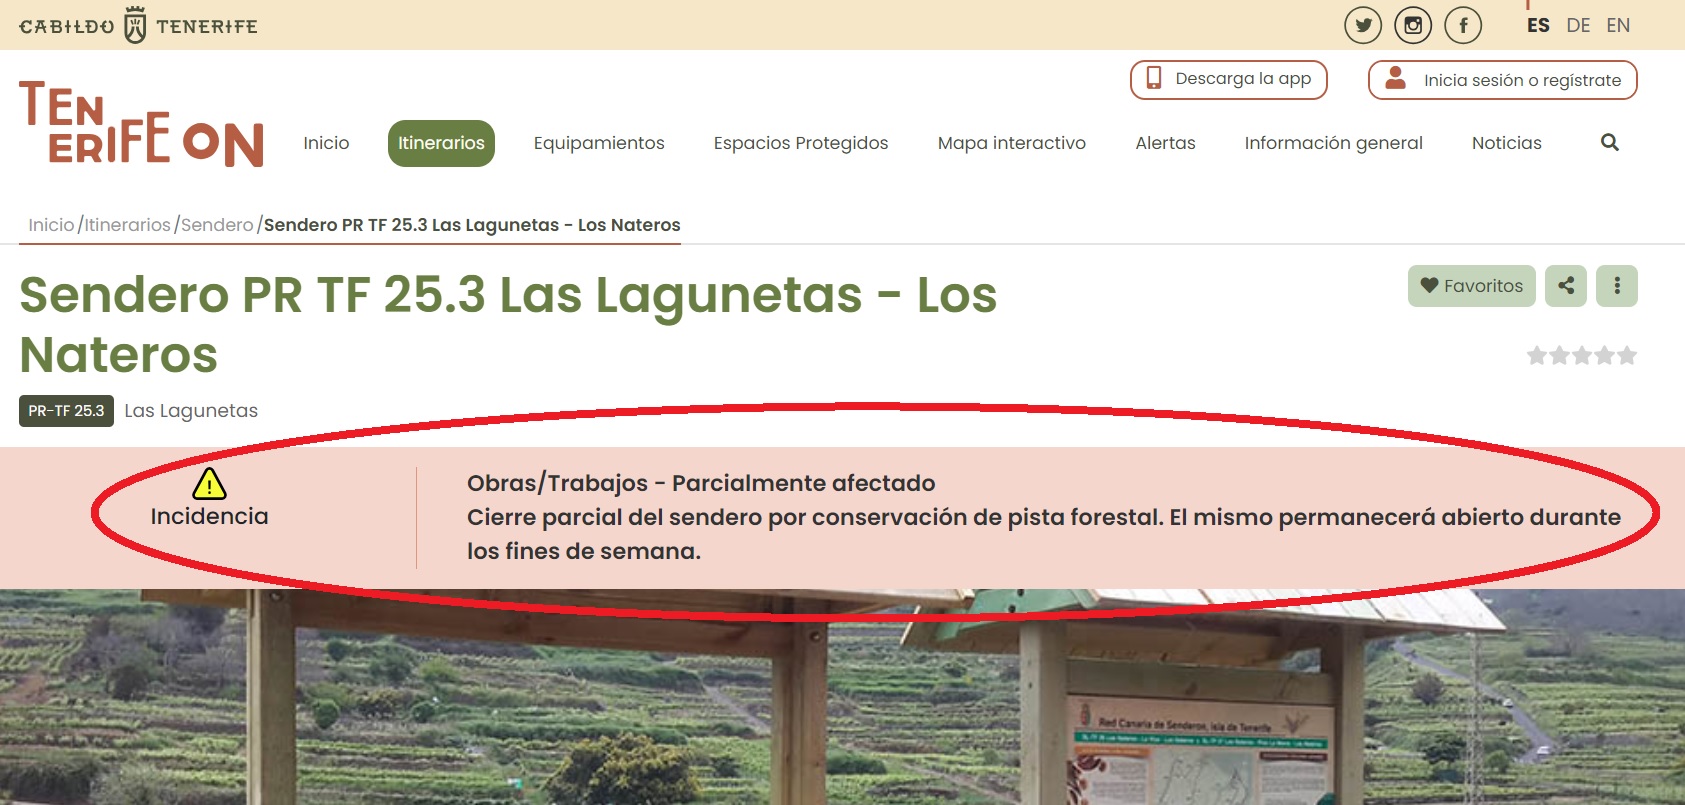
Incidents
Restrictions on the use of trails or natural facilities due to refurbishment works, landslides or other circumstances. These incidents may affect your route plan, so it is essential that you consult them just before setting off.
Because of the critical nature of this information, you can find it in 3 different formats on our platform:
1. List of alerts and incidents
This list can be found in the “Alerts” section of the main menu and displays the active alerts and incidents, indicating the reason, the start date of the restriction and, if necessary, times of closure or any other relevant information.
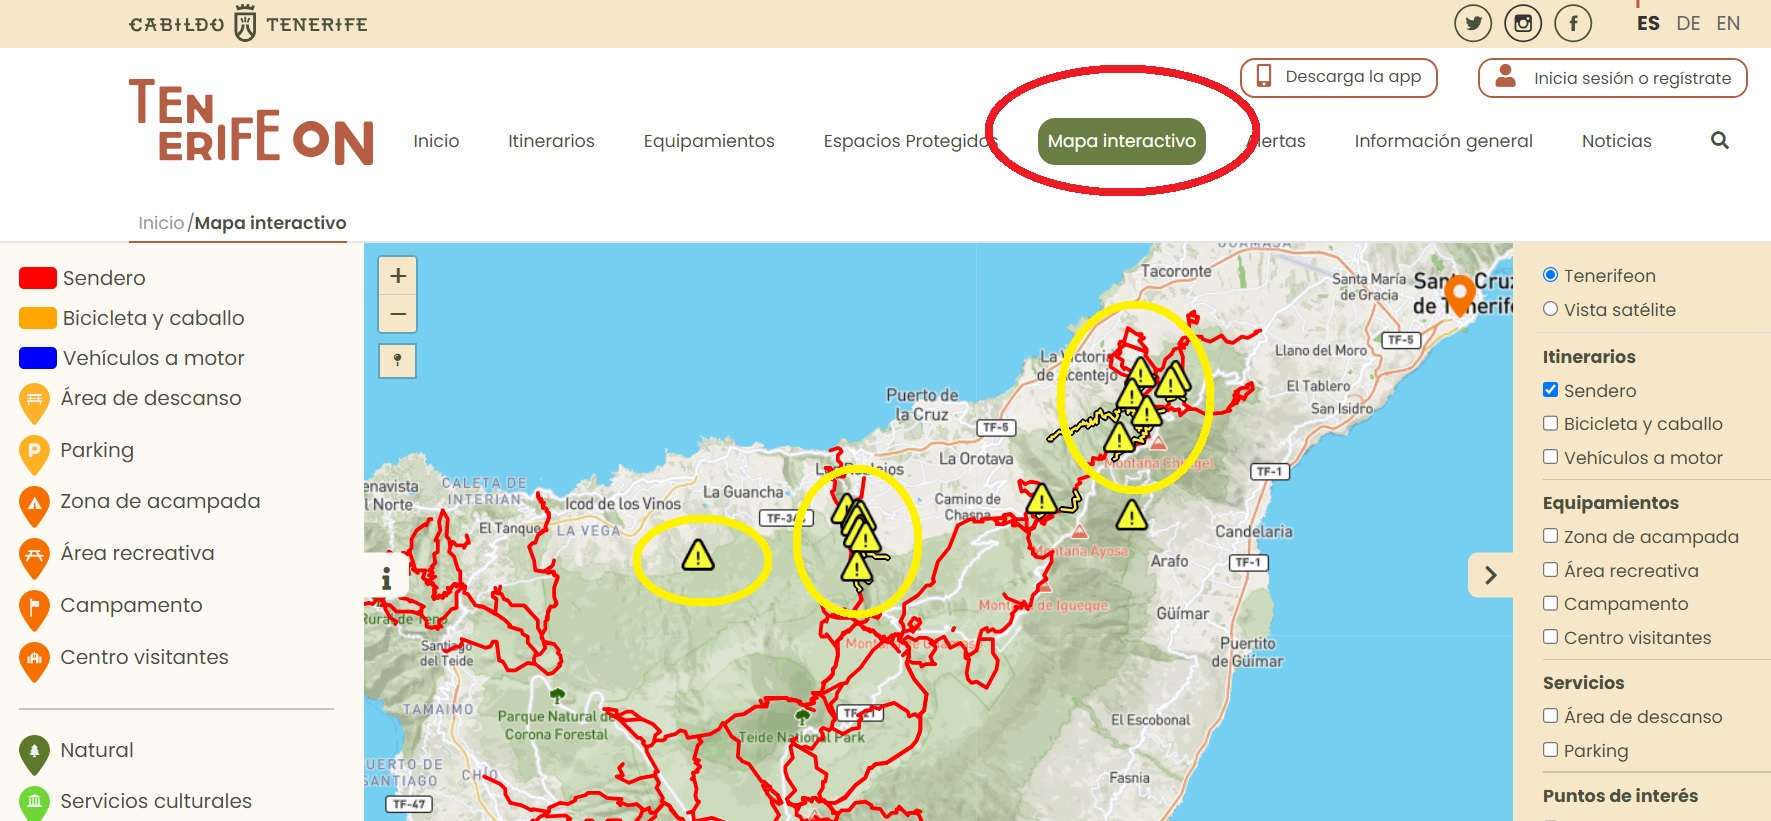
2. Interactive map
Trails and facilities with use restrictions are marked with a yellow triangle and the “warning” icon on the interactive map.
This allows you to identify and avoid affected areas at a glance before planning your excursion.
3. Route information
You will also find detailed information about any incidents that may affect your trip on the information page of each trail.
So you can see that it is essential that you check the status of the trail on the day you plan to go, but it is now quick and easy to do so thanks to the Tenerife ON platform.
If you find restrictions on your planned route, look for a safer and more suitable alternative.
Just explore the large network of trails offered by the platform and choose your Plan B from hundreds of options. Choose one that suits your needs and is incident-free to make the most of the experience.😊
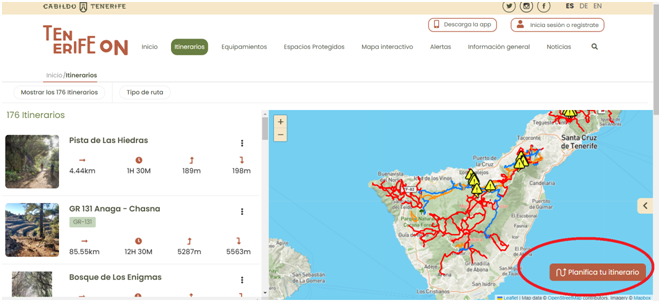
The route planner is a Tenerife On tool that allows you to combine several trails.
You can use it to plan a new, made-to-measure route, using the Tenerife Island Council’s network of trails but choosing your own start and finish and waypoints.
If it is viable, the tool will give you the option to create that route and obtain the information you need to do it, including the track and the descriptions of the different combined routes.
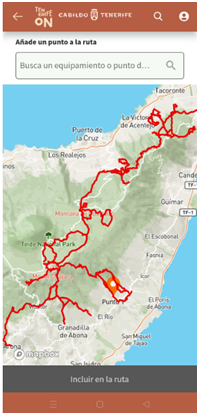
With the Tenerife ON route planner you can create a personalised hiking route from the network of trails included in this platform, without ever having to leave the network.
To create your route and save it in the app, follow these simple steps:
1. Log in
If you want to save your planned route, you first need to log in to the app with your username and password, either when you open the app or from the main menu.
.

Still don’t have a Tenerife ON account? You can create one in the app in less than a minute.
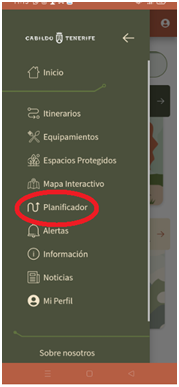
2. Go to the route planner
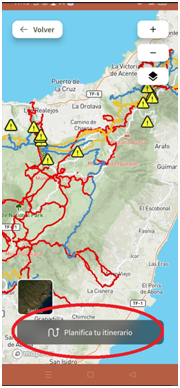
After logging in, access the planner from the main menu or from the button on the interactive map.
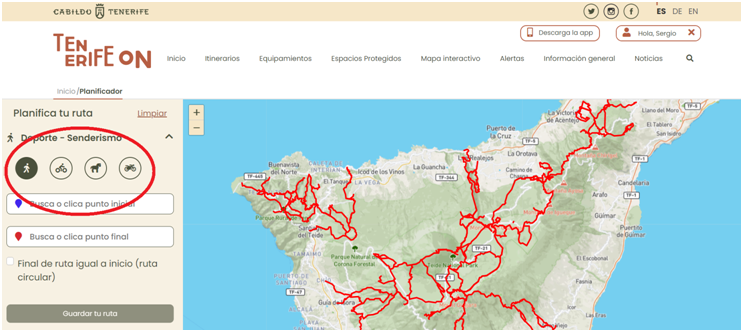
3. Choose your activity
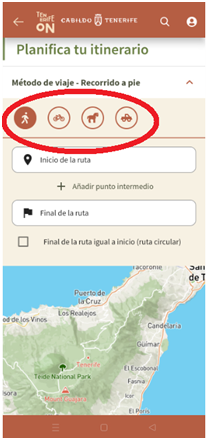
To indicate what type of route you want to plan (hiking, cycling, horse riding or motor vehicle), tap on the “Method of travel” drop-down menu and tap on the corresponding icon.
In the following example you can see the “Hiking” option selected.
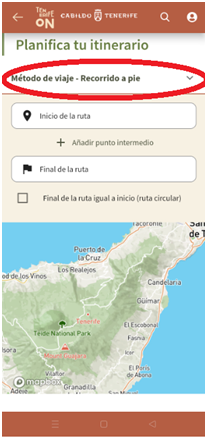
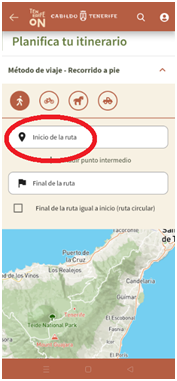
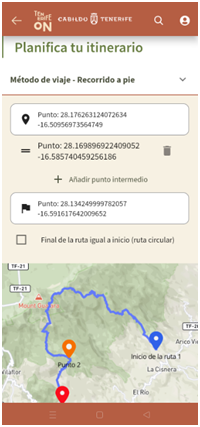
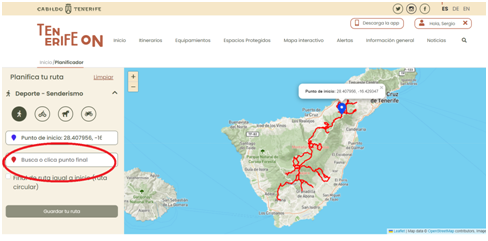
4. Select a start and end point
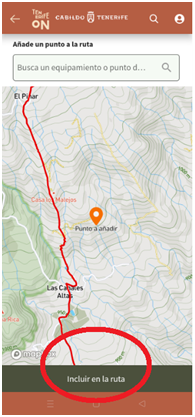
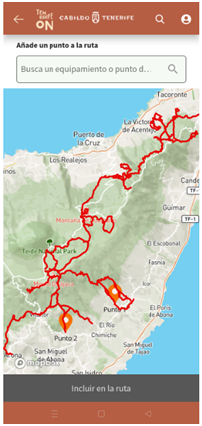
Now, tap on the field marked “Start point” and tap on the point on the map where you would like to start, always on the lines that mark the available routes.
You will see an orange marker appear at the chosen spot.
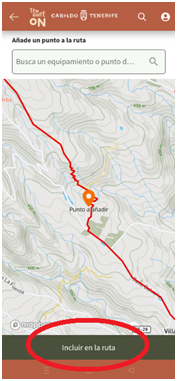
To confirm, tap on “Include in route”».

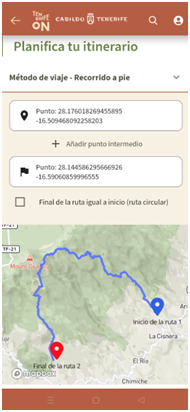
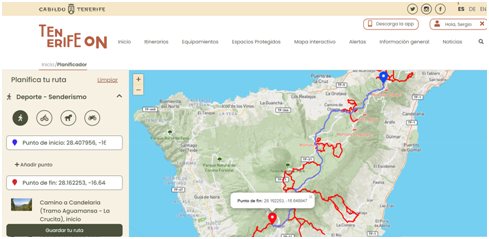
Then tap on “End point” and tap on the point on the map where you would like to end the route. Again, make sure you choose a spot on one of the tracks shown on the map, all of which are connected to the starting point.
You will see a new orange marker appear at the chosen spot. To confirm, tap again on “Include in route”.
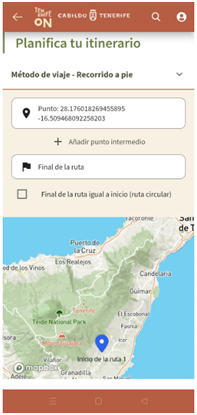
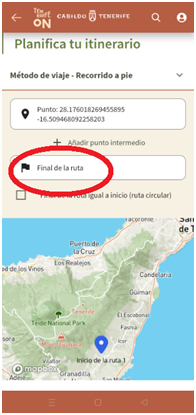
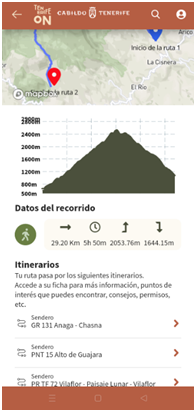
After this step you will be able to see the route you have planned on the map, from the start point in blue to the end point in red, and if you scroll down the page, the routes it includes, its profile, distance, elevation gain and estimated duration.
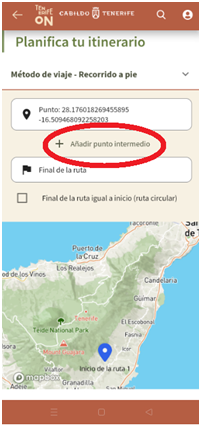
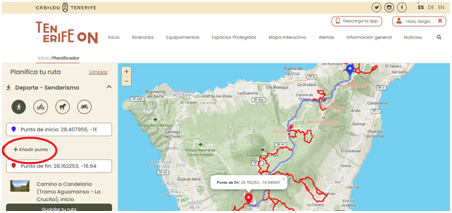
5. Add waypoints (optional)
Already have the route you were looking for? Then go directly to step 7.
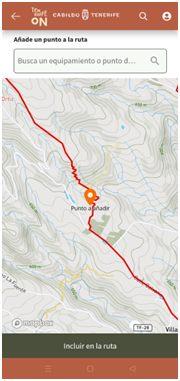
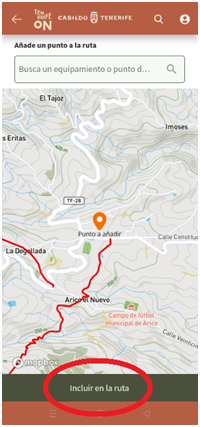
Do you want to add stops or changes to the route proposed by the planner? Then tap on “+ Add point” and tap on the place on the map where you would like the route to pass through, as long as it is on one of the available routes.
You will see a new orange marker appear on the interactive map. To confirm, tap again on “Include in route”. The route will then be updated to include that location.
Remember that you can add as many waypoints as you wish to your route.
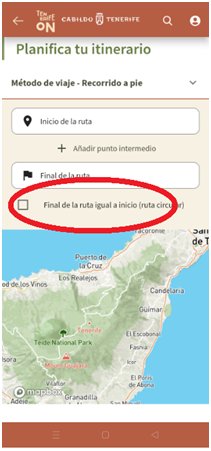
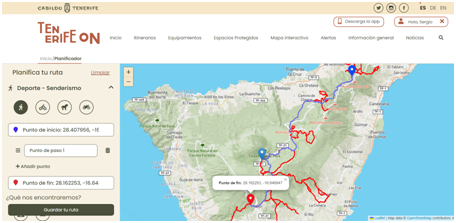
6. Turn your route into a loop (optional)
Already have the customised route you wanted? Then go directly to step 7.
Do you want to create a circular route that starts and ends at the same point? Then tick the box “Same start and end point (circular route)”.
You will see that the planner recalculates your route to be circular.
Bear in mind, however, that in most cases the only option to return to the start of the route will be to use the same trail that you started on. Use the waypoints to extend or reduce the length of your route as you wish.
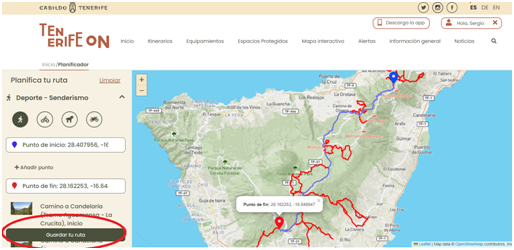
7. Save your route
Already have the personalised route you wanted? Then click on “Save the route” and give it the name of your choice.
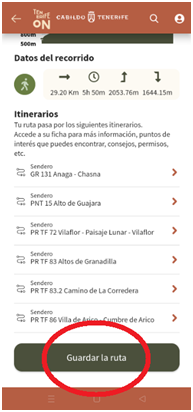
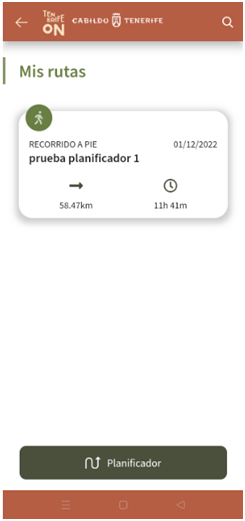
You can now view and follow this track whenever you want in My Profile - My Routes, which you can access from the main menu of the app.
With the tenerifeon.es route planner you can create a personalised hiking route from the network of trails included in this platform, without ever having to leave the network.
To create your route and save it in your profile, follow these simple steps:
1. Log in
If you want to save your planned route, you first need to log in to the platform from this page with your username and password.
Still don’t have a Tenerife ON account? Click on the link and create one in less than a minute.
2. Go to planner
After logging in, open the planner by clicking on this link or any of the “Go to planner” buttons that you see on the website, for example on the home page, the route finder, under the description of each route and at the foot of most of our information pages.
3. Choose your activity
Click on the type of route you want to plan: hiking, cycling and horse riding or motor vehicle.
In the following example you can see the “Hiking” option selected.
4. Select a start and end point
Now, click on “Search for or click on start point” and click on the point on the map where you would like to start the route, always on the lines that mark the available routes.
You will see a blue marker appear on the map with your starting coordinates.
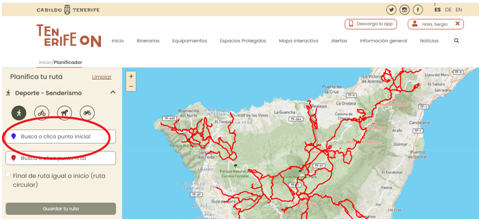
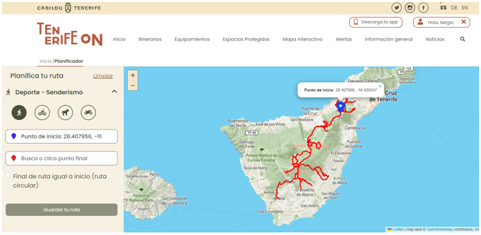
You will see that, from this point on, the interactive map will only show you the trails that connect to the start point you have chosen.
Then click on “Search for or click on end point” and click on the point on the map where you would like to end the route.
You will see a red marker with the coordinates of the end point and the planned route in blue between start and finish.
5. Add waypoints (optional)
Already have the route you were looking for? Then go directly to step 7.
Do you want to add stops or changes to the route proposed by the planner? Then click on “+ Add point”.
You will see a new blue marker appear on the interactive map. Drag it to the place you want your route to pass through, always within the network of routes shown on the map. The route will then be updated to include that location.
Remember that you can add as many waypoints as you wish to your route.
6. Turn your route into a loop (optional)
Already have the route you were looking for? Then go directly to step 7.
Do you want to create a circular route that starts and ends at the same point? Then tick the box “Same start and end point (circular route)”.
At first the planner will not make any changes, but if you add a new waypoint or change the location of an existing one, the tool will recalculate your route to make it circular.
Bear in mind, however, that in most cases the only option to return to the start of the route will be to use the same trail that you started on. Use the waypoints to extend or reduce the length of your route..

7. Save your route
Already have the personalised route you wanted? Then click on “Save route” and give it the name of your choice.
From now on you can view and follow that track whenever you want from your saved routes..
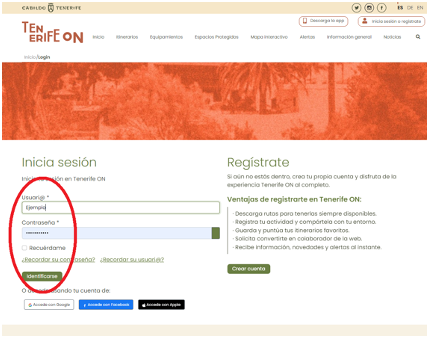
To log in to Tenerife On, make sure that you are entering your username and password correctly, including capital letters, numbers and symbols.
If you continue to have problems logging in, you can ask for your password to be reset.
And if you still can’t access your account after that, please contact us so we can try to help you find a solution.
Email.- tenerifeon@gesplan.es
The Tenerife On website belongs to the Tenerife Island Council and all the information it contains is free for all users.
Therefore, there is no cost to the public for any of Tenerife On’s services, although the website may take you to third-party providers who offer paid services. In any case, these will never be associated with or dependent on Tenerife On.
Of course you can.
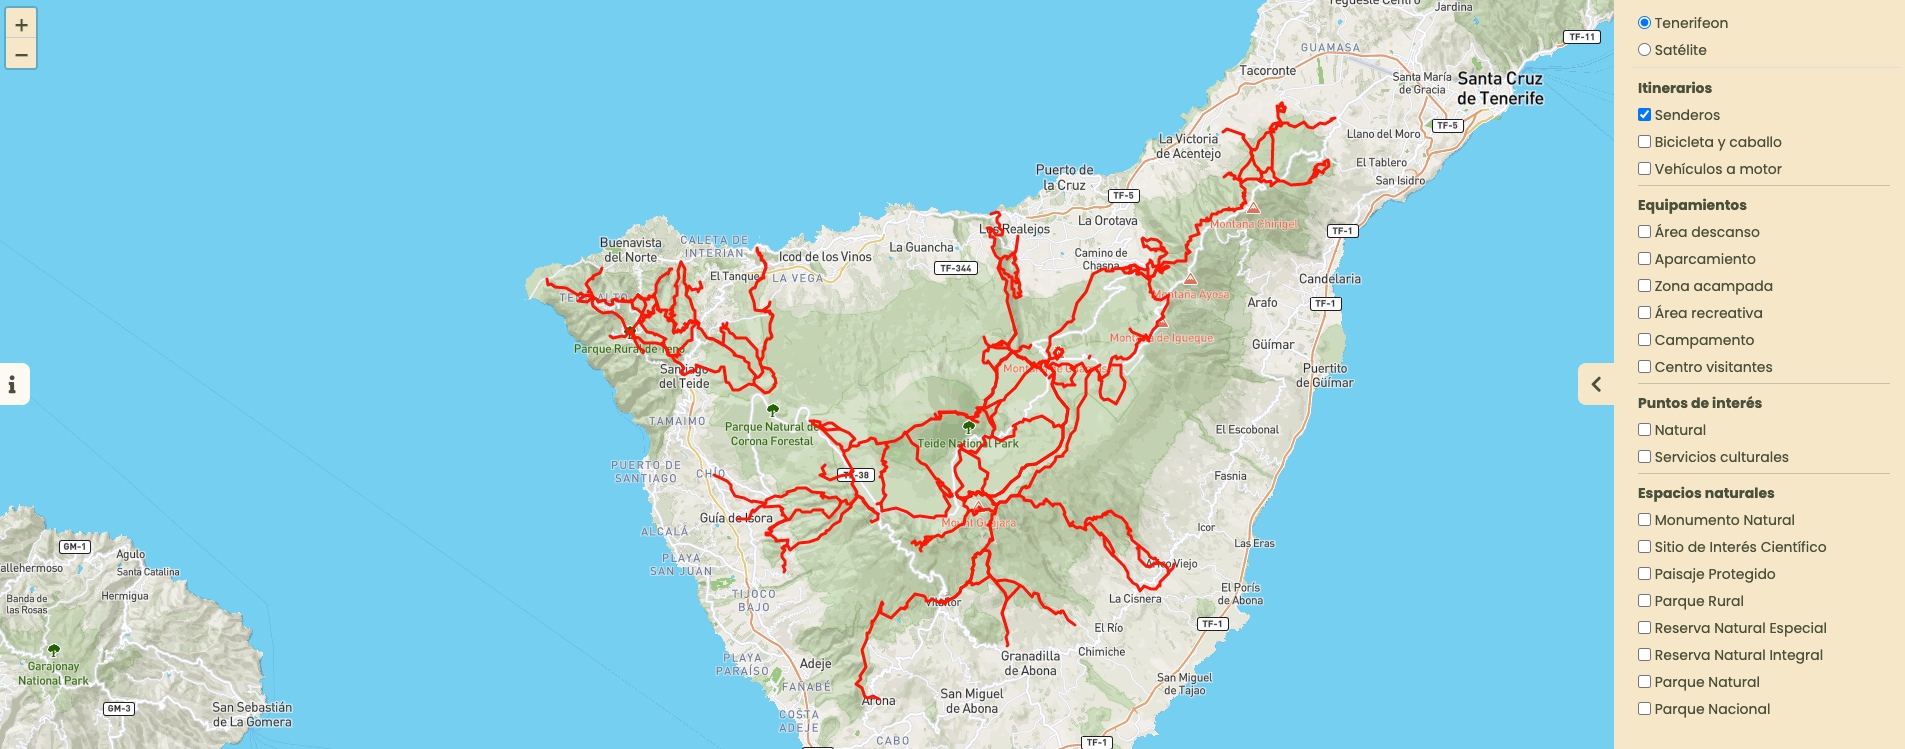
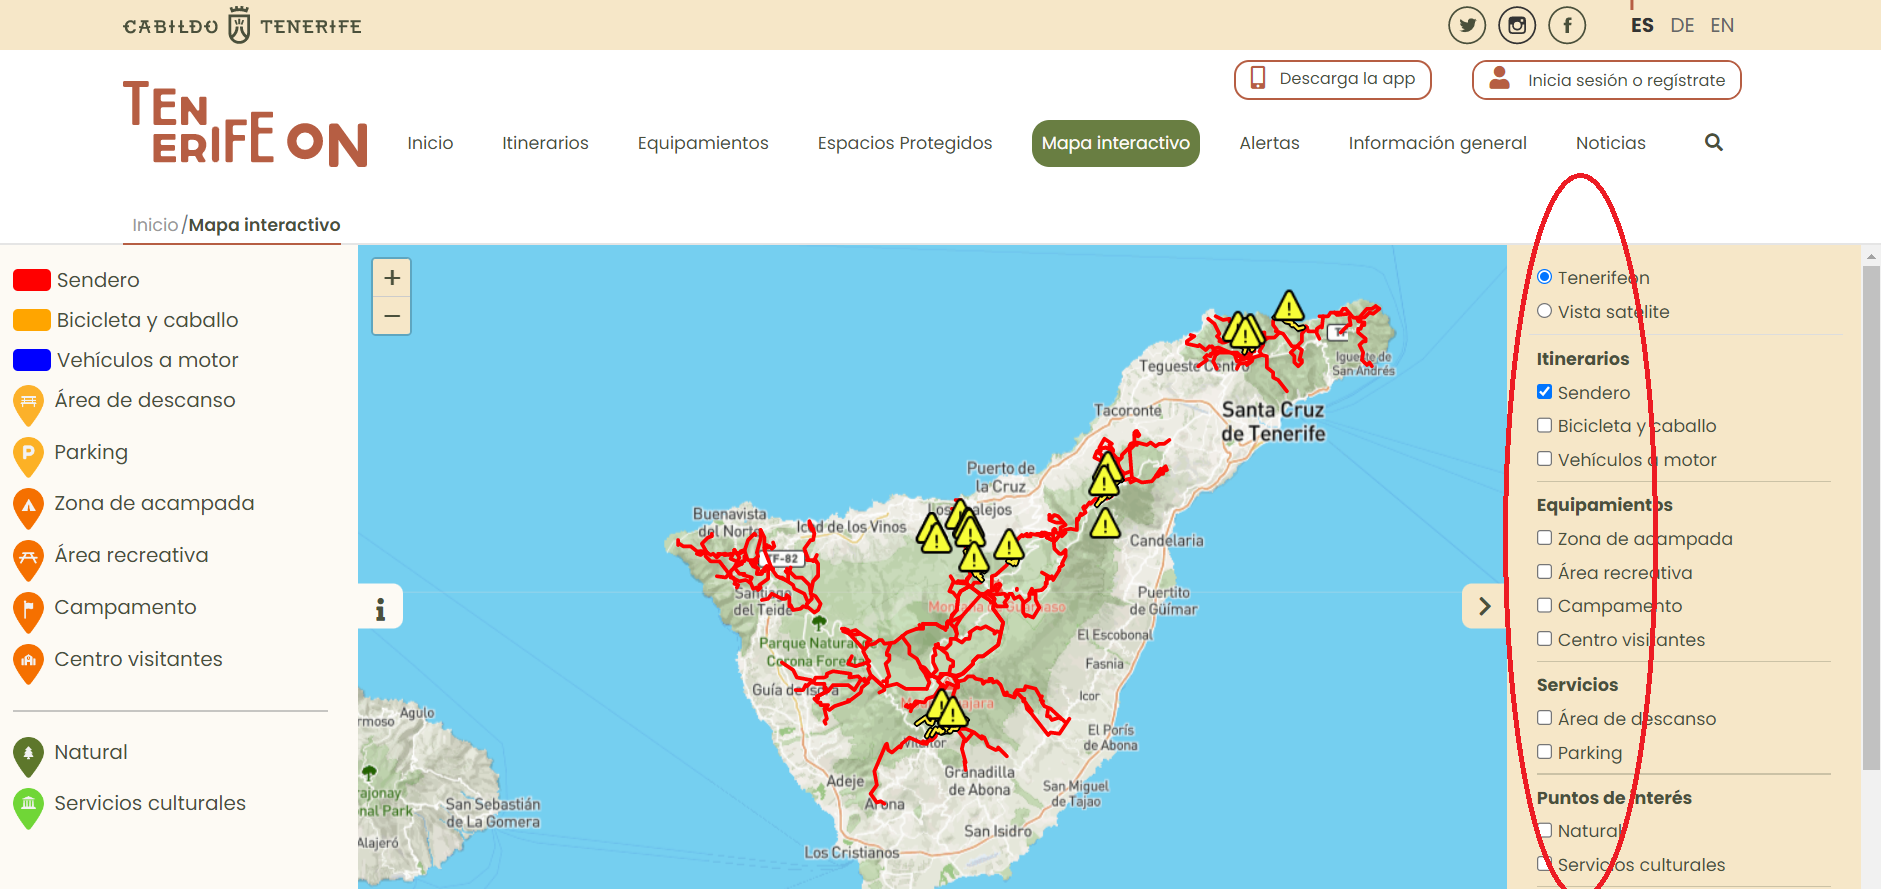
You can select the type of information you want to display on the interactive map:
- Normal map
- Satellite view
On the interactive map you can show or hide different layers of information and access them according to your preferences, for example:
- Points of interest selected for you.
- Incidents.
- Public facilities in the natural environment.
- Protected Natural Areas.
- Municipalities
You have several search options in Tenerife On:
- If you know the name or code of your route, enter it in the search bar.
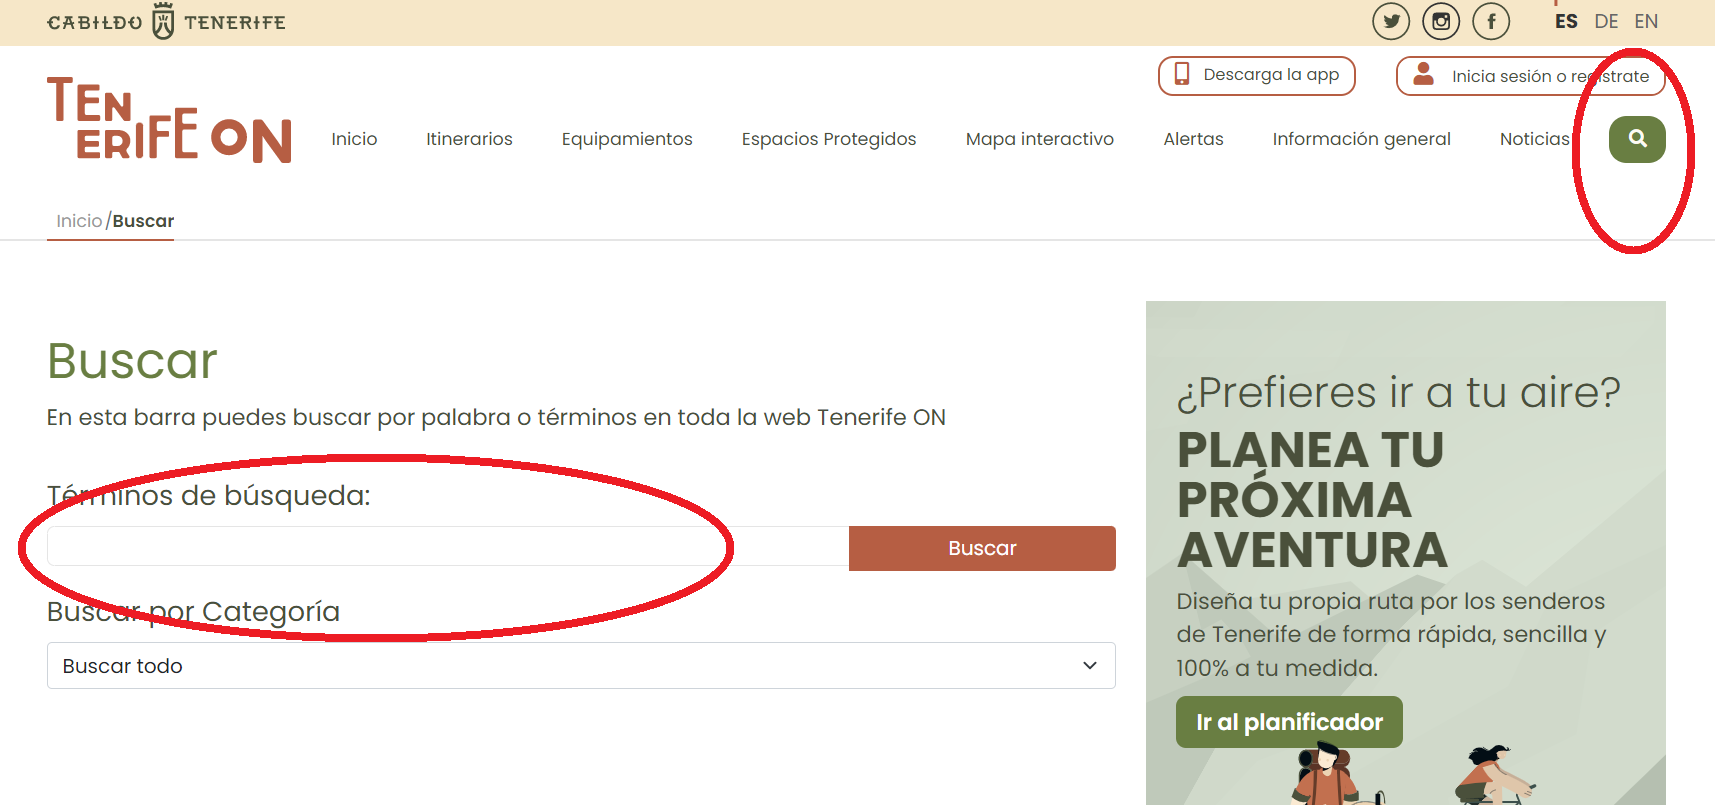
- Filter by preferences in the route section, according to length, location, effort, etc.
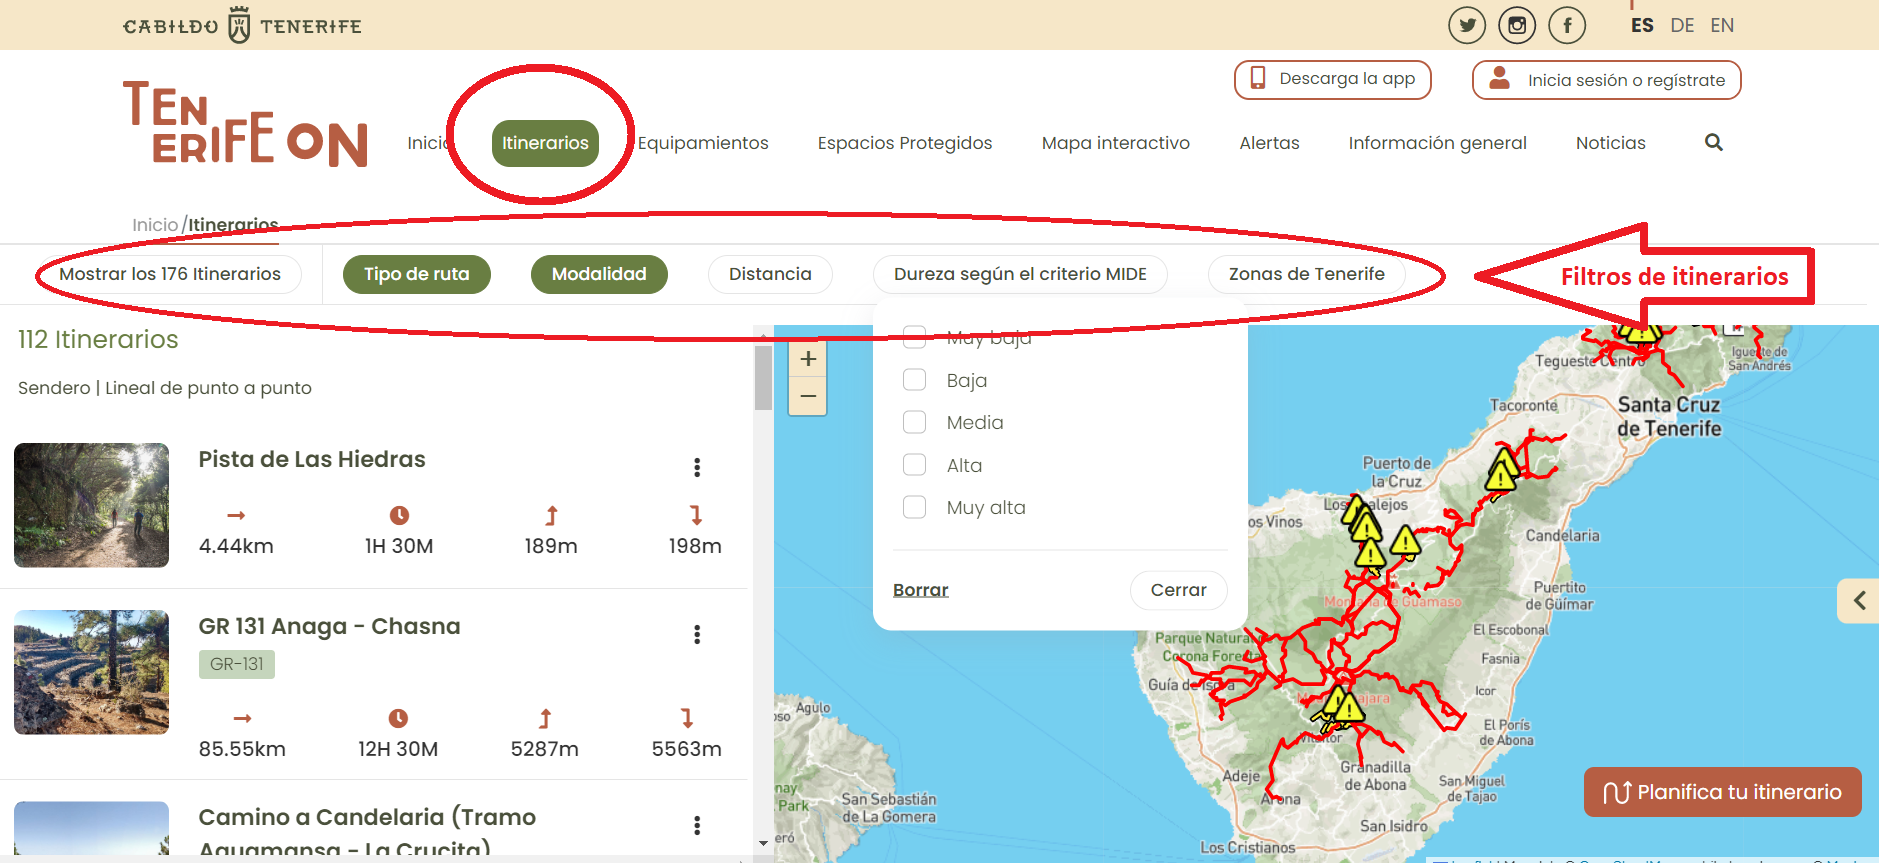
- Find your ideal activity by browsing our interactive map.
Yes, as long as you have logged in and downloaded the route descriptions and maps beforehand.
From your Tenerife On account, all you have to do is go to “My routes” to view what you have downloaded and follow the track by activating GPS on your device, without the need for reception or internet access.
You do not have to register to use its basic features.
However, you will only be able to get the most out of the platform if you register:
- Save your activities in your profile.
- Use the maps and downloaded information offline.
- Rate the facilities and routes.
- Share your trips with your friends and family.
- Receive updates and alerts.
- And many more extra features...
If you want to save your favourite routes, record your activities, and receive real-time alerts about Tenerife’s natural areas, you will need to create a personal account on Tenerife On.
To do this, you can register on the Tenerife ON app or on the tenerifeon.es website by following these steps:
1. Go to the registration page
From any section of the website, click on the “Login or register” button that appears in the top right corner of the screen.
Then, on this page, click on the “Register” button, as shown in the following image:

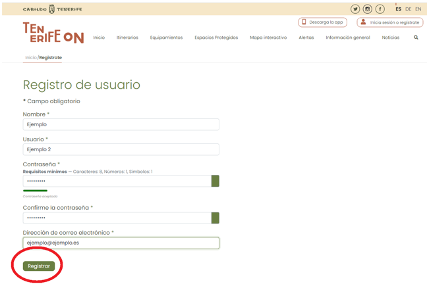
2. Fill in your details
This button takes you to the registration page, where you will need to fill in the following information:
- Name: give your name.
- Username: choose a unique username that is easy to remember as you will use it to identify yourself in the future.
- Password: create a password with at least 8 characters, including at least one number, one uppercase letter, one lowercase letter and one special character (#*+@).
- Confirm Password: enter the same password to make sure it is correct.
- Email Address: enter your preferred email address here and check that it contains no errors.
Once you have completed the form, click on the “Register” button.
At this point, the page will display a message like this:
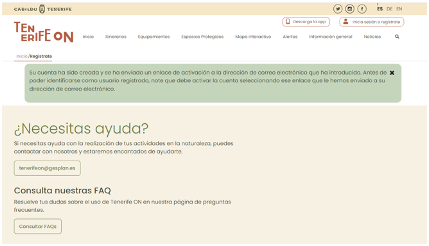
3. Activate your account
If the email address you have entered is valid, you will receive an email with a link to activate your account. Click on this link to activate your account.
4. Access your account
From now on you will be able to access your Tenerife On account whenever you want using your username and password, both from the app and from the login page of the website.
Once you have logged in, you will be able to consult and modify your details, view your activities, downloads and saved routes.
Already have a Tenerife ON account? Then get ready to enjoy outdoor activities on the island as never before.
Tenerife On may store information about your activities, but always anonymously and for strictly statistical purposes.
Tenerife On needs access to your location in order to be able to offer the best facilities and routes near you, as well as to provide you with information about your surroundings.